0104: Widget Opacity II – Real Ghosting and More Real Ghosting
Last time, we looked at how to fake ghosting using the setOpacity() function. This time, we’ll see how to do proper ghosting using the setSensitive() function. Then we’ll move on to an example wherein we overlay buttons, one ghosted and one not, over an image. And we’ll be using a Layout instead of a Grid this time.
How to Make a Cruel Widget
Well, not exactly cruel… just insensitive.
Last time, it took more code to get this job done. For one thing, MySwitch needed a ghosting flag to keep track of when the opacity was low. And for another, we needed an entire function (switchGhosting) so MyButton could turn ghosting on and off.
But this time, we eliminate both of these. MyButton, because it has MySwitch set up as a companion (like we did last time) can go straight for the jugular:
bool onButtonPress(Event e, Widget w)
{
if(companion.getSensitive() is false)
{
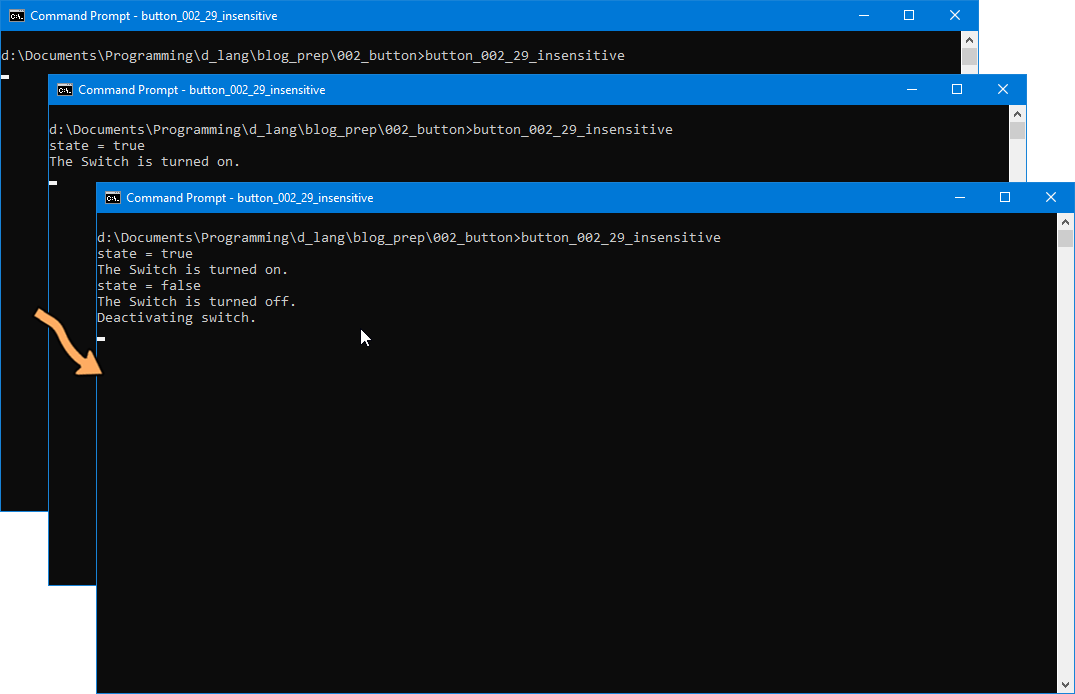
writeln("Activating switch");
companion.setSensitive(true);
setLabel(labelText[1]);
}
else
{
writeln("Deactivating switch.");
companion.setSensitive(false);
setLabel(labelText[0]);
}
return(true);
} // onButtonPress()
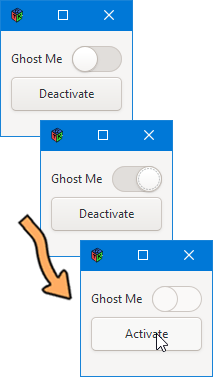
It checks to see which way MySwitch’s sensitivity is set and flips it to the other state. Because we’re doing it this way, the opacity of the Label isn’t going to match MySwitch’s insensitive state. This may be confusing for the user, so syncing the Label’s appearance with that of MySwitch may be something to try as an exercise.
Or not.
Moving right along…
The only other difference between this example and the last one is that the only object that knows about the Label is the ButtonGrid, so all references to Label outside of ButtonGrid are now eliminated.
Ghosted Buttons on an Image
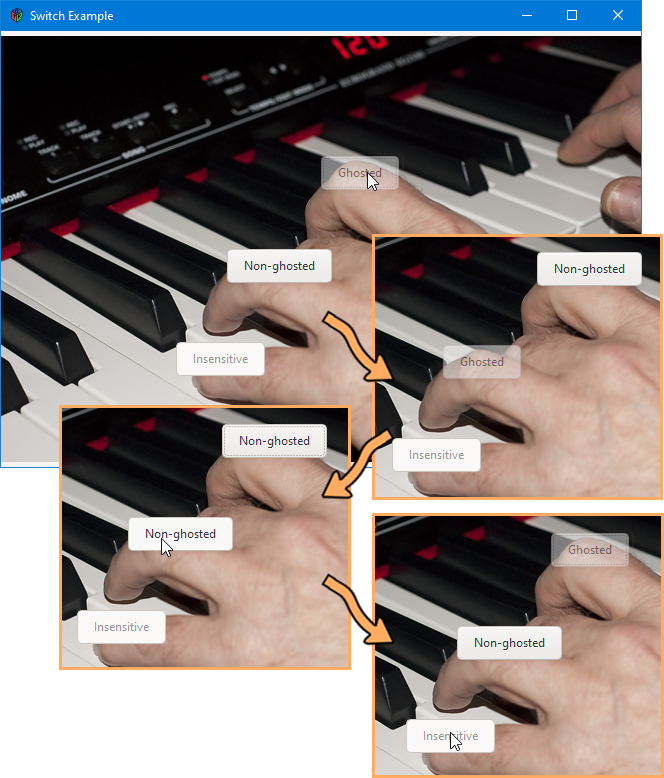
There may be nothing inherently new in this demo, but it is another way to demonstrate what we’re talking about as well as present another possible use case. Here is a list of what’s being demonstrated here:
- an opacity-ghosted
Buttoncan be active, - an insensitive
Buttoncan’t, and - making a
Buttoninsensitive doesn’t change its opacity.
And since we’re using a Layout instead of a Grid, let’s look at how all this fits together…
The BGLayout Class
class BGLayout : Layout
{
	MyButton myButton1, myButton2, myButton3;
	BGDrawingArea bgDrawing;

	this()
	{
		super(null, null);
		setSizeRequest(640, 426); // has to be set so signals get through from child widgets

		bgDrawing = new BGDrawingArea();
		put(bgDrawing, 0, 0);

		myButton1 = new MyButton(0);
		put(myButton1, 226, 213);
		myButton1.setOpacity(0.5);

		myButton2 = new MyButton(1);
		put(myButton2, 320, 120);

		myButton3 = new MyButton(2);
		put(myButton3, 175, 306);
		myButton3.setSensitive(false);

	} // this()

} // class BGLayout
Because we want to place these Buttons over parts of the image that will show through, thus proving the transparency of the Buttons, we’re using a Layout so we don’t have to fiddle around too much when placing them.
Notice also that each call to MyButton() passes in a number. This is the index into the labelText array in the MyButton class and decides which of the three strings we’ll use initially for labeling the Buttons.
The MyButton Class
Here’s the preamble where the labelText string array is defined:
string[] labelText = ["Ghosted", "Non-ghosted", "Insensitive"];
The Constructor
this(int labelIndex)
{
	super(labelText[labelIndex]);
	addOnButtonPress(&onButtonPress);

} // this()
Just pick the label string and hook up the signal.
The Callback
bool onButtonPress(Event e, Widget w)
{
	if(getOpacity() !is 1.0)
	{
		setLabel(labelText[1]);
		setOpacity(1.0);
		writeln("opacity = ", getOpacity(), ", turning it to full.");
	}
	else
	{
		setLabel(labelText[0]);
		setOpacity(0.5);
		writeln("opacity = ", getOpacity(), ", turning it to half.");
	}
	writeln("Button pressed is: ", getLabel());

	return(true);

} // onButtonPress()
Here, we check the opacity setting, using an if/else to switch back and forth from half opacity to full.
You may wonder why I’ve done it this way, checking to see if opacity is set to 1.0. In fact, you may be tempted to test if it’s set to 0.5 (I was at first.). But the reality of the situation is that when you set the opacity to 0.5, it’s actually set to 0.501961. It’s our old buddy FPI (Floating Point Inaccuracy) come to play havoc with our sanity. You could test for 0.501961 if you like, but I don’t imagine it’s worth the extra typing. Who knows if the inaccuracy will be the same from one OS to another or between the 32-bit and the 64-bit versions of an OS. It seems more sane to me to test for 1.0 instead. Or if you want to deal with finer-tuned numbers, just look for a range like this:
if(getOpacity() > 0.5 && getOpacity() < 0.6)
Of course, you might also switch based on the labelText, like this:
if(getLabel() == labelText[0])
{
	setLabel(labelText[1]);
	setOpacity(1.0);
	writeln("label: ", getLabel(), ", opacity = ", getOpacity(), ", turning it to full.");
}
else
{
	setLabel(labelText[0]);
	setOpacity(0.5);
	writeln("label: ", getLabel(), ", opacity = ", getOpacity(), ", turning it to half.");
}
All this does is look to see if the label text is “Ghosted” and if it is, changes it to “Non-ghosted”.
Note: You might think you can do a string comparison with the is keyword as in:
if(getLabel() is labelText[0])
However, because D uses Unicode strings, we can’t do that, but but we can do this:
getLabel() == labelText[0]
I’ve left both methods in the source with the label comparison commented out so you can (to borrow an expression from my grandmother) pick your choose.
Conclusion
So much for ghosting, opacity, and sensitivity. Next time, we’ll look at some common D-language stuff that you may find useful in building a UI, even though these snippets aren’t necessarily GTK-specific.
Until then, have a happy life.

Comments? Questions? Observations?
Did we miss a tidbit of information that would make this post even more informative? Let's talk about it in the comments.
- come on over to the D Language Forum and look for one of the gtkDcoding announcement posts,
- drop by the GtkD Forum,
- follow the link below to email me, or
- go to the gtkDcoding Facebook page.
You can also subscribe via RSS so you won't miss anything. Thank you very much for dropping by.
© Copyright 2024 Ron Tarrant