0024: Switch and LightSwitch
For today, we’ll be looking at two code files:
- one showing off a Switch widget, and
- the other, a derived class we’ll call the LightSwitch.
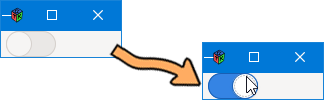
And what we’ll be playing with is the GTK Switch widget. First, we’ll get it up and running, then we’ll do something interesting with it. We’ll combine the Switch with some other widgets to create a light bulb with changeable colours and a reset button.
And Now, a Switch
I won’t bother going over the TestRigWindow stuff; I think we all know the ins and outs of that by now. So, let’s start with:
import gtk.Switch;
That’s the only extra import statement you’ll need for the first example, the plain-jane switch. Now let’s look at the class derived from the Switch:
class MySwitch : Switch
{
this()
{
super();
addOnStateSet(&onStateSet);
} // this()
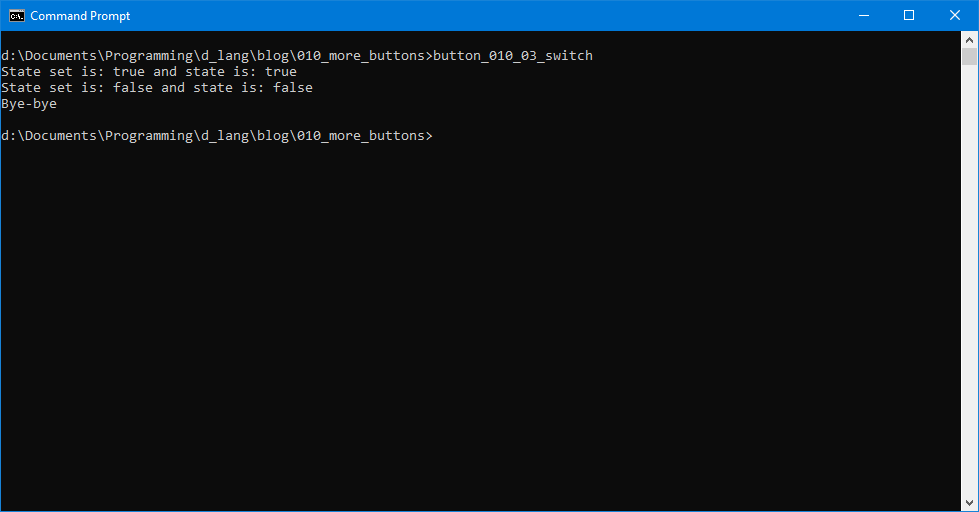
bool onStateSet(bool state, Switch s)
{
setState(state);
writeln("State set is: ", getState(), " and state is: ", state);
return(true);
} // onStateSet()
} // class MySwitch
For the most part, this is pretty standard stuff. We’ve seen derived classes before and we’ve seen signals hooked up, but what we haven’t seen is an argument list that seems out of order. Take a look at the onStateSet() function.
First argument is a Boolean value called state. This is the first widget we’ve examined that passes its state along with the signal. It’s handy because we don’t need to go dig it out with a getState() function. It’s just there, ready to use in our callback.
As usual, we can ignore the self-referential argument, Switch s. It’s the same as Button b, Widget w, or Event e, all of which we’ve ignored in setting up callbacks in the past.
In the body of the callback… wait a minute. Why do we get a state, but then have to set it? Good question.
It seems that whereas we have the convenience of getting the state packaged with the signal, we still have to muck around to keep things in sync. To do that, we call setState().
And a LightBulb-ish Thing
What’s a Switch without something to turn on or off?
To get this all happening, we want:
- a switch,
- a light bulb, and
- a reset button.
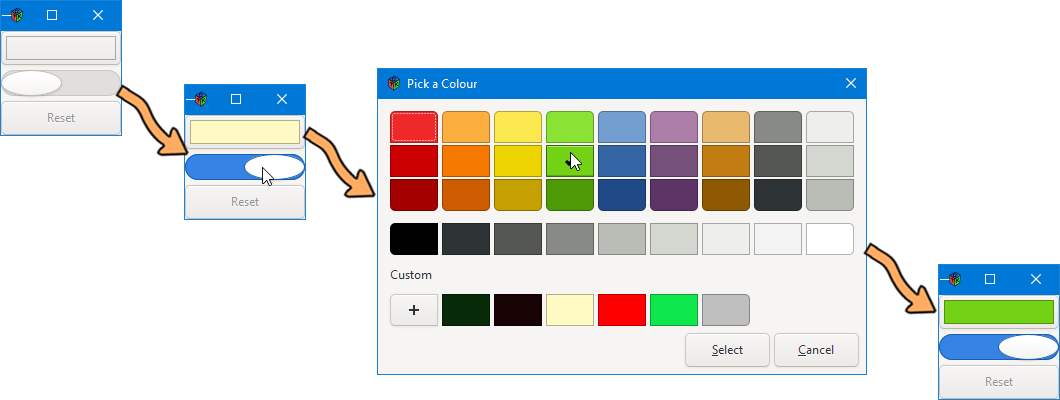
The Switch, we already have from the first exercise. The light bulb can be made from a ColorButton widget and the reset button from a standard, vanilla-flavored Button. Let’s first take a quick look at the container these three will be crammed into.
SwitchBox Class
As with earlier container examples, the SwitchBox is where we declare and define all the widgets. Because they’re all derived classes, the names won’t mean much for now. And all we really do here in the SwitchBox is build the buttons and stuff them in.
LightSwitch Class
This class bears little resemblance to the MySwitch class of the previous example. For one thing, it has a reference pointer to the LightBulb class (which we’ll see in a moment) and this we set up by passing in the pointer during the constructor phase. In effect, what this does is allow the LightSwitch class to behave like an observer.
Next, the onStateSet() function doesn’t just keep the signal state in sync with the internal state, it takes care of setting the colour of the LightBulb widget (remember that a ColorButton displays its colour on the button itself). And before it exits, it updates the state of the LightBulb’s switch as well so that all states match across both widgets.
LightBulb Class
This ColorButton is more elaborate than the last one we played with. Instead of just one colour and a default, it’s got an onColor, an offColor, and defaults for both. It’s a bit more to track and so the LightBulb takes on characteristics of the observed to match LightSwitch’s observer status.
In the constructor, we naturally have some initial housekeeping to do, set both default colours as well as the colours we’ll show the world as the light is switched on or off.
The switchState() function is called by the observer (the LightSwitch) to turn the ‘light’ on or off. All it does is check to see which state the LightBulb is in and switch to the other.
I’ll skip over getState() as being obvious enough as to not need explanation.
The setColor() function is the callback as obviated by how we hooked up the onColorSet signal to it back in the constructor. Because of the nature of the ColorButton, once the user has set the colour, all we have to do is grab it from the ColorButton’s internal storage with getRgba(). Then we’re back to dealing with state, is it true (ON) or false (OFF)? Because the colour we’ll set will be the colour used for whichever state is current, on or off, right?
Finally, we have the reset() function that restores default colours to both on and off states.
ResetButton Class
The last class we’ve defined also tracks the LightBulb object and works closely with the reset() function built into the LightBulb. First it calls the LightBulb’s reset() function, then to keep everything else in sync, it sets the LightBulb’s onColor and offColor.
Conclusion
So there you have it, a straightforward example of how to use a Switch widget as well as a more complex example where we give it something somewhat meaningful to do.
Hope this was as interesting to read about as it was to research and write (both the code and the blog entry).
Until next time, happy D-coding and may your Widgets always find their way home.

Comments? Questions? Observations?
Did we miss a tidbit of information that would make this post even more informative? Let's talk about it in the comments.
- come on over to the D Language Forum and look for one of the gtkDcoding announcement posts,
- drop by the GtkD Forum,
- follow the link below to email me, or
- go to the gtkDcoding Facebook page.
You can also subscribe via RSS so you won't miss anything. Thank you very much for dropping by.
© Copyright 2024 Ron Tarrant