0023: Radio and Color Selection Buttons
RadioButtons are complex and tricky suckers and if you don’t prep their bits and pieces in just the right order, they aren’t going to work. ColorButtons? Not so much, but to harness a ColorButton to do our bidding means we’ll use a signal found in no other widget.
Put Your RadioButton On
As with so many other widgets, stuffing a set of RadioButtons into a Box makes good sense. At the design stage, you can move that Box around easily and take all the RadioButtons along with no fuss. And we already know the advantages of Boxes at runtime, but if you don’t remember, it gives us a place from which to observe and manipulate them.
So, let’s look at the RadioBox, a child class born of the Box:
class RadioBox : Box
{
int padding = 5;
Observed observed = new Observed(null);
MyRadioButton button1, button2, button3;
ActionButton actionButton;
this()
{
super(Orientation.VERTICAL, padding);
button1 = new MyRadioButton("button 1", observed);
button2 = new MyRadioButton("button 2", observed);
button2.setGroup(button1.getGroup());
button3 = new MyRadioButton("button 3", observed);
button3.setGroup(button1.getGroup());
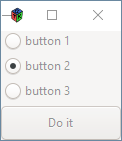
setActiveButton(button2);
actionButton = new ActionButton(observed);
add(button1);
add(button2);
add(button3);
add(actionButton);
} // this()
void setActiveButton(Button button)
{
// set which button is active on start-up
observed.setState(button2.getLabel()); // initial state
button2.setActive(true); // set AFTER all buttons are instantiated
} // setActiveButton()
} // class Radiobox
RadioBox: An Observation Point
First thing of note is that we’re once again using an Observed class. If you think about it, there’s not much point in having a set of RadioButtons if they aren’t affecting some entity that is, in turn, being observed by some other entity. Here, the RadioButtons affect an Observed object and the ActionButton acts as observer, modifying its behaviour based on what it sees.
RadioButton Creation
The first RadioButton is easy, just create it, give it a name, etc., and you’re done. But with the second RadioButton in the set, that’s where you need to know the tricky bit.
Yes, we simply create button2, but then we need to tell it that it’s in the same Group as button1. But the Group doesn’t exist, and can’t exist, before button1 is created. Even then, the only way to find the Group and tell button2 about it is to get it from button1.
But once you know that, adding button3 or other subsequent buttons is dead easy again.
RadioButton State
If we don’t care which RadioButton is active, all we have to do is sync up the state of the observed object so it points at the default active RadioButton and that’s always going to be the first one created, button1 in this example.
But if we want one of the others to be active on start-up, as well as syncing up the observed object, we have to call that button’s setActive(true) function. To simplify this two-step process, I broke it out into its own function, setActiveButton().
And one more note about this: Don’t try to set state or setActive() until all the buttons are created. Your results may be unpredictable.
MyRadioButton Class
Familiar territory, this. Hook up the observed object, attach a signal and we’re ready to go.
One thing of note: Because we’re using the onToggle signal, we have to declare our RadioButton as a ToggleButton or we’ll get an error. This works because RadioButton is a grandchild of ToggleButton (with CheckButton being in the middle of the hierarchy). In effect, we’re borrowing grandma’s signal. If we try to do this any other way, casting the button as a RadioButton (or as its parent, a CheckButton) won’t work because the onToggle() delegate can only take a ToggleButton as its argument.
ActionButton and Observed class
Same as with the MyRadioButton, we’ve seen all this before. At least, we’ve seen stuff like it.
So, let’s move on to our next subject…
A ColorButton to Select Color
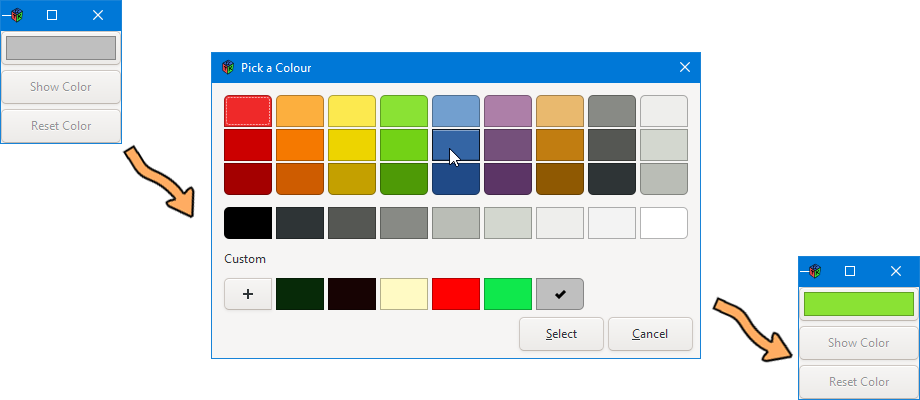
The similarities between this example and the previous one won’t be lost on you. Instead of a RadioBox, we’ve got a ColorBox and in it:
- a similar
Observedobject, - a
FetchColorButtonto fetch, - a
ResetColorButtonto reset the color to its default, and - an array to hold them all.
And everything else is stuff we’ve seen before. A quick browser through the code will get you up to speed as long as you’ve been following these blog posts in order and haven’t jumped straight here.
There are two places where notable differences show up. One is in the construction of the ObservedColor class:
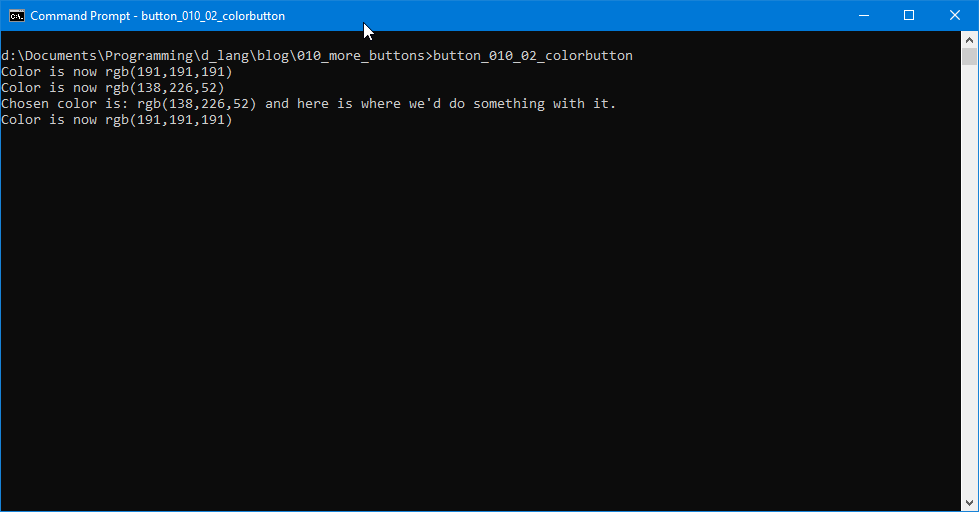
class ObservedColor                                                             // *** NOTE *** r, g, b, a = 0.00 - 1.0
{
	private:
	string message = "Color is now ";
	RGBA color;
	RGBA defaultColor;
	float red = .75, green = .75, blue = .75, alpha = 1.0;

	this()
	{
		defaultColor = new RGBA(red, green, blue, alpha);
		setColor(defaultColor);

	} // this()


	public:

	void setColor(RGBA extColor)
	{
		color = extColor;
		writeln(message, extColor);

	} // setColor()


	RGBA getColor()
	{
		return(color);

	} // getColor()

} // class ObservedColor
In earlier Observed objects, we used strings to keep track of state, but here we’re storing the actual RGBA objects themselves (ie. the colors) within the Observed object. This gives us a central location to store colors that’s accessible to any object in the ColorBox.
And if we want to add a second color (perhaps we want a foreground color and a background color a la Photoshop) we simply add a second ColorBox, label the two ColorBoxes as Foreground and Background, and we’re set.
Of course, you’d likely want to be a little slicker with the UI design, but this gives you a place from which to leap off the cliff.
And so we wrap up another gtkDcoding blog post with this: May your bugs only nip you a bit, and not byte.

Comments? Questions? Observations?
Did we miss a tidbit of information that would make this post even more informative? Let's talk about it in the comments.
- come on over to the D Language Forum and look for one of the gtkDcoding announcement posts,
- drop by the GtkD Forum,
- follow the link below to email me, or
- go to the gtkDcoding Facebook page.
You can also subscribe via RSS so you won't miss anything. Thank you very much for dropping by.
© Copyright 2024 Ron Tarrant