0044: Dialogs X - Customizing (3 of 3)
- Fancy Content Area
A reminder…
This collection of topics is split up like this:
- Part I (the time before last) deals with how to create an aesthetically-pleasing widget layout for a custom
Dialog, - Part II (last time) covers user interaction, and
- Part III (this time) brings it all together.
As promised, this time around we talk about the Dialog’s Content Area and wrap up by rolling our own Action Area and Content Area together into a fully-fledged custom Dialog. However, since we went over Action Area stuff last time and this example is only different in a few small way, I’m not going to discuss it here except to say:
The Action Area used in this example uses an array of roll-yer-own Button Label text strings. ‘Nuff said. And now…
The Content Area
The first thing to know about the Content Area is that it’s just an ordinary Box jammed into the top section of the Dialog. Knowing that, we just isolate the Content Area so we can address it directly, then treat it like any other Box. It takes a couple of steps to get there, but it works, so why not?
In the constructor, we instantiate the Dialog, then call a function named farmOutContent() to do the dirty work:
this(Window parentWindow)
{
	_parentWindow = parentWindow;
	super(titleText, _parentWindow, flags, buttonLabels, responseTypes);
	farmOutContent();

	addOnResponse(&doSomething);
	run();
	destroy();

} // this()
And here’s that farming function which really just gives us a convenient handle to grab our Box and hand it around:
void farmOutContent()
{
	// FARM it out to AreaContent class
	contentArea = getContentArea();
	areaContent = new AreaContent(contentArea);

} // farmOutContent()
It may seem redundant to have variables for both areaContent and contentArea, but keep in mind that one’s a Box and the other is a customized ContentArea object which contains that Box we grabbed from the the Dialog. The fact that we’re passing contentArea to the AreaContent class’s constructor is a dead giveaway. It’s the same technique we used for defining Part I’s HPadBox. And the AreaContent object wraps the handle.
And here’s where it all gets wrapped up in a nice, neat… um… object:
class AreaContent
{
	private:
	Box _contentArea;
	PadGrid _padGrid;

	public:
	this(Box contentArea)
	{
		_contentArea = contentArea;
		_padGrid = new PadGrid();
		_contentArea.add(_padGrid);
		_contentArea.showAll();

	} // this()

The _contentArea property is defined as a Box (note that we don’t need to call cast() for this to work) and it gets assigned to the Box pointer passed into the constructor. The constructor goes on to create our padded Grid (the PadGrid class) and stuffs that into the Content Area.
And this is important: We have to call _contentArea.showAll() for the Dialog just as we do with a MainWindow. If we don’t, the Dialog will appear without its Content Area.
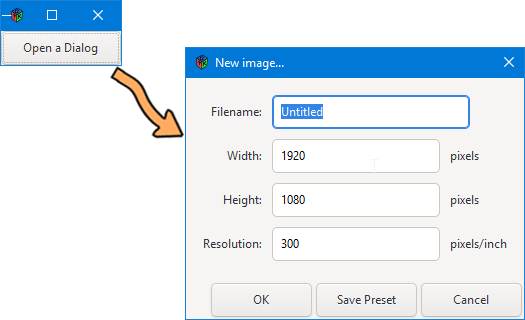
The PadGrid (see Part I of this series if you haven’t already) has morphed into the NewImageDataGrid class (but only to support the paradigm present in the example) and contains all the bits and bobs for gathering data from the user. In this case, we’re gathering a file name, x and y dimensions, and the resolution of a new image to create. For the sake of brevity, I won’t reproduce the entire NewImageDataGrid here, but these are the properties it contains:
- a
Label,Entry, and placeholder text for the file name, and - a name
Label,Entry, placeholder text, and unitsLabelfor each of these:- width,
- height, and
- resolution.
And all that stuff is stored in these variables:
_filename,_width,_height, and_resolution.
Naturally, the constructor takes all these properties, instantiates all the Labels and Entrys, then stuffs them into the super-class Grid while also using values from our PadBoxJustify enum to make things look nice.
Note: When using the Grid’s attach() function, the arguments are:
- child = the widget to add,
- left = the column number to attach the left side of @child to,
- top = the row number to attach the top side of @child to,
- width = the number of columns that @child will span, and
- height = the number of rows that @child will span.
And like when we were dealing with menus, it’s always a good idea to draw a diagram of your Grid layout to more easily keep track of what’s going on.
And one function in the NewImageDataGrid will be of interest. It looks like this:
Tuple!(string, int, int, int) getData()
{
	_filename = filenameEntry.getText();
	_width = to!int(widthEntry.getText());
	_height = to!int(heightEntry.getText());
	_resolution = to!int(resolutionEntry.getText());

	// build an associative array of user-supplied data
	return(tuple(_filename, _width, _height, _resolution));

} // getData()
What you’re looking at is some D-specific coolness. To get the user-supplied data out of the Entrys, we’re dealing with two kinds of data, a string and a handful of integers. We use D’s Tuple(S, I, I, I) construct to declare a mixed return value and tuple() to put it together before handing it to the return() statement.
Note: You can also return a mixed bag of variables using a Variant or struct. Here’s a short bit of example code showing all three: tuple, Variant, and struct.
Using this as a model, you can grab any combination of mixed data from the user, package it up, and get it back to whatever caller needs it.
Now, let’s skip back to the NewImageDialog’s callback function… well, part of it, anyway…
Retrieving the User-supplied Data
To handle the Buttons in the action area, I set up a switch() statement inside the doSomething() callback. Here’s one relevant bit of that switch/case code. And for convenience, here’s the entire file again if you don’t wanna scroll back up to the link):
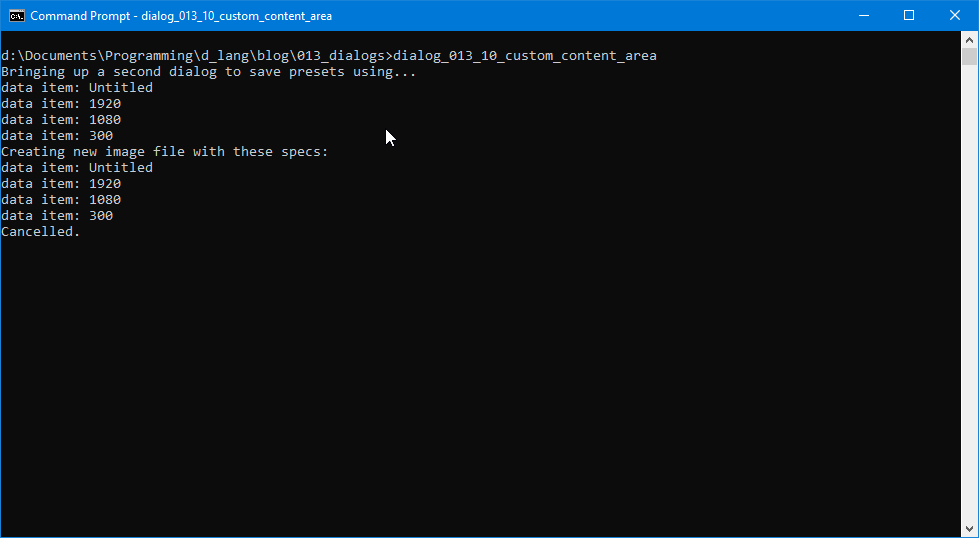
case ResponseType.OK:
	writeln("Creating new image file with these specs:");

	foreach(item; areaContent.getNewImageDataGrid.getData())
	{
		writeln("data item: ", item);

	}

break;
If the user clicked on the OK button in the Action Area, we step through each item in the tuple returned by getData() and print it to the terminal. Naturally, you’d wanna do this differently in an application, perhaps more like this:
writeln("filename: ", areaContent.getNewImageDataGrid.getData()[0]);
writeln("width: ", areaContent.getNewImageDataGrid.getData()[1]);
writeln("height: ", areaContent.getNewImageDataGrid.getData()[2]);
writeln("resolution: ", areaContent.getNewImageDataGrid.getData()[3]);
So you can work with the variables independently of each other.
Conclusion
And that is it! You now have all the information you need to:
- build a custom
Dialog, - populate it with
Widgets, - make everything look pretty, and
- retrieve user-supplied data for use in your application.
May you have as much fun creating your own custom Dialogs as I did coming up with these examples and writing this mini-series around them.
And remember: semper ubi sub-ubi.

Comments? Questions? Observations?
Did we miss a tidbit of information that would make this post even more informative? Let's talk about it in the comments.
- come on over to the D Language Forum and look for one of the gtkDcoding announcement posts,
- drop by the GtkD Forum,
- follow the link below to email me, or
- go to the gtkDcoding Facebook page.
You can also subscribe via RSS so you won't miss anything. Thank you very much for dropping by.
© Copyright 2024 Ron Tarrant