0022: Building a Grid with a GTK… Grid
Taking the subject of the last blog post a bit further, we’re going to look at Labels again, but in another type of container, the Grid.
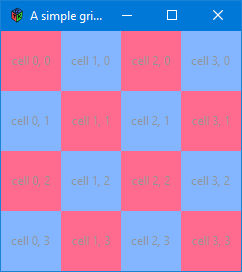
How many rows and/or columns are in a grid? It depends on how many cells you stuff in there. You don’t pre-define the number of rows and columns. Instead, the Grid redefines its layout as cells are added. Put a cell into position 0, 0 and you’ve got one row, one column. Follow this with another cell at position 0, 1 and you’ve got two rows, but still only one column. And you should be able to extrapolate from there… 1, 0 gives you two rows, two columns with cell 1, 1 empty, etc.
The Basic Grid


In this example, we stuff cells into the Grid “longhand” by defining each one and sticking it into a specific position within the Grid. I did this example this way because the second one—which pushes the cells in using a pair of for loops—gets a bit cryptic, not making it clear how cells within the Grid are numbered.
Let’s dive in, shall we?
A New Type of MainWindow
This time around, I dropped the TestRigWindow class and cut right to the chase, defining a GridWindow class derived from the MainWindow superclass. From there, it was just a matter of setting up a Grid, sticking things into each cell of the Grid, and then tossing that into the GridWindow. Easy.
And the cell stuffing was done, as mentioned earlier, by hand. Here are the first two rows:
// row 0
RedLabel zeroZero = new RedLabel("cell 0, 0");
grid.attach(zeroZero, 0, 0, 1, 1);
BlueLabel oneZero = new BlueLabel("cell 1, 0");
grid.attach(oneZero, 1, 0, 1, 1);
RedLabel twoZero = new RedLabel("cell 2, 0");
grid.attach(twoZero, 2, 0, 1, 1);
BlueLabel threeZero = new BlueLabel("cell 3, 0");
grid.attach(threeZero, 3, 0, 1, 1);

// row 1
BlueLabel zeroOne = new BlueLabel("cell 0, 1");
grid.attach(zeroOne, 0, 1, 1, 1);
RedLabel oneOne = new RedLabel("cell 1, 1");
grid.attach(oneOne, 1, 1, 1, 1);
BlueLabel twoOne = new BlueLabel("cell 2, 1");
grid.attach(twoOne, 2, 1, 1, 1);
RedLabel threeOne = new RedLabel("cell 3, 1");
grid.attach(threeOne, 3, 1, 1, 1);
And as I implied in the last post, we now have a BlueLabel as well as a RedLabel (shades of that whisky everyone raves about). Here’s the super-class they’re derived from:
class WideLabel : EventBox
{
	Label label;

	this(string text)
	{
			super();

			label = new Label(text);
			label.setSizeRequest(60, 60);
			add(label);

	} // this()

} // class WideLabel
I suppose I should have called it ColorLabel, but the code’s written now and I’m tired, so WideLabel it is. What sets this class apart from the RedLabel of yore (and made me think to call it Wide) is that I hard-coded the Label size. Rather than using extra space on either side of the text and blank lines above and below, I got all sophisticated and called setSizeRequest() to make all the Labels (and therefore the cells) a specific, uniform size.
The RedLabel looks very much the same as before—other than its size—and BlueLabel is the same except… well, it’s blue.
And don’t overlook the extra imports at the top of the file, some of which we used last time, too:
import gtk.Grid;
import gtk.EventBox;
import gtk.RGBA;
- The
Gridimport is self-explanatory. - But the
EventBox, which one might think would be imported from GDK rather than GTK, in fact, bucks the trend. RGBAlets us define a colour, and- the comment below the import statements mentions that
StateFlagsare found inc.types.
Defining a Grid the Shorthand Way
Now let’s look at some of the bits and bobs in there. The results of all this code are the same as with our first example, but getting there via a different route. Here’s the constructor, which is the essence of things:
this()
{
	int x, y; // positions within the grid
	int xOddEven, yOddEven;
	string labelText;

	super(title);

	grid = new Grid();

	foreach(int x; 0..4)
	{
		foreach(int y; 0..4)
		{
			xOddEven = x % 2; // row # odd or even?
			yOddEven = y % 2; // column # odd or even?
			labelText = format("cell %d, %d", x, y);

			if((xOddEven == 0 && yOddEven == 0) || (xOddEven != 0 && yOddEven != 0 ))
			{
				RedLabel label = new RedLabel(labelText);
				labels ~= label; // add in scope
				grid.attach(label, x, y, 1, 1); // use in scope
			}
			else
			{
				BlueLabel label = new BlueLabel(labelText);
				labels ~= label;
				grid.attach(label, x, y, 1, 1);
			}
		}
	}

	add(grid);

} // this()
It’s a bit of a mind-bender to follow, but the long and short of it is:
- where the row and column numbers are both odd or both even, squares are red (that’s the
ifstatement) - where one is odd and the other even, squares are blue (that’s the
else) - x = rows
- y = columns
And, in case you’ve never come across the D-style foreach(), it’s kind of cool because you can replace for(int x; x < 4; x++) with foreach(int x; 0..4). It’s less typing and, IMO, rather elegant. You can still use the for() construct if you want, though, so it’s up to you which you pick.
And that wraps up another adventure in GtkD coding-land. Bye for now.

Comments? Questions? Observations?
Did we miss a tidbit of information that would make this post even more informative? Let's talk about it in the comments.
- come on over to the D Language Forum and look for one of the gtkDcoding announcement posts,
- drop by the GtkD Forum,
- follow the link below to email me, or
- go to the gtkDcoding Facebook page.
You can also subscribe via RSS so you won't miss anything. Thank you very much for dropping by.
© Copyright 2024 Ron Tarrant