0021: Labels with Background Colors & Markup
Whenever you create a GTK Button and slap text on it, even though it’s not obvious at first glance, the text ends up on a Label. So, today we’re going to skip the Button and go straight to the Label.
Label Background Color
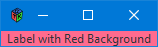
One thing you can’t do with a Label is give it a colored background… unless you stick the Label into an EventBox.
Abbreviated Intro to the EventBox
This widget was mostly invented so programmers could reanimate dead things like Labels and make them react to mouse clicks and keyboard input. An EventBox allows us to let loose our inner Frankenstein, but we can do more then react to events. We can also change the background colour through the use of StateFlags and overrides.
There is baggage, however. We need to build a colour from scratch before we engage the EventBox’s overrideBackgroundColor() function. Here’s what all that looks like:
class RedLabel : EventBox
{
	Label label;
	RGBA redishColor;
	// extra spaces at start and end so it doesn't look crowded
	string labelText = "  Label with Red Background  ";

	this()
	{
		super();
		label = new Label(labelText);
		redishColor = new RGBA(1.0, 0.420, 0.557, 1.0);
		overrideBackgroundColor(StateFlags.NORMAL, redishColor);

		add(label);

	} // this()

} // class RedLabel
You’ll notice that we’re deriving a new class from the EventBox. We could go a step further down the OOP trail and do this up as an interface and derive the RedLabel from there, leaving us with a pattern for creating Labels of other colours down the road. But for now, this’ll do.
The labelText string has lots of extra space on either side, but this is for aesthetic reasons. Letting the text touch the edges of the coloured area is like fingernails on a chalkboard to my inner designer. (Mad scientist, designer… yeah, it’s crowded in there.)
Color as an RGBA Object
Smack in the middle of the constructor is where we build the colour as an RGBA object. Keep in mind that GTK defines each colour with four channels:
- red,
- green,
- blue, and
- alpha.
And the values for those channels have a range from 0.0 to 1.0 rather than the 0 to 255 (or #00 to #FF) we may be used to seeing. You’ll need a calculator to convert from Photoshop or G.I.M.P. palette colours. Of course, you could also use Blender which would be handier because Blender uses that same 0.0 to 1.0 range. No conversion necessary. Besides, Blender’s free.
The second-last line of the constructor calls overrideBackgroundColor(), telling it our customized colour goes along with the NORMAL state of the EventBox. In other words, the EventBox doesn’t have to be selected, checked, hovered over, or in focus for our custom colour to appear.
And finally, we drop the Label into the EventBox.
Moving right along…
Markup on a Label
GTK patterns its markup after HTML, css, and all that web stuff, so if you’re familiar with web development at the hand-coding level, you’re well prepared.
The MarkupSwitchButton Class
That’s this thing:
class MarkupSwitchButton : Button
{
	MarkupLabel muLabel;

	this()
	{
		super();
		muLabel = new MarkupLabel();
		add(muLabel);

		addOnClicked(&switchStuff);

	} // this()


	void switchStuff(Button b)
	{
		muLabel.markupSwitch();

	} // switchStuff()

} // class MarkupSwitchButton
The class is based on a Button and we drop in the fancied-up Label. Then we point the callback at the markupSwitch() function, a member function of the MarkupLabel class… which looks like this:
class MarkupLabel : Label
{
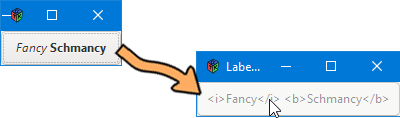
string markupText = "<i>Fancy</i> <b>Schmancy</b>";
string onMessage = "Markup is ON.";
string offMessage = "Markup is OFF.";
string currentStateMessage;
this()
{
super(markupText);
setUseMarkup(true);
currentStateMessage = onMessage;
markupState();
} // this()
// a function to turn markup on and off
void markupSwitch()
{
if(getUseMarkup() == true)
{
setUseMarkup(false);
currentStateMessage = offMessage;
}
else
{
setUseMarkup(true);
currentStateMessage = onMessage;
}
markupState();
} // markupSwitch()
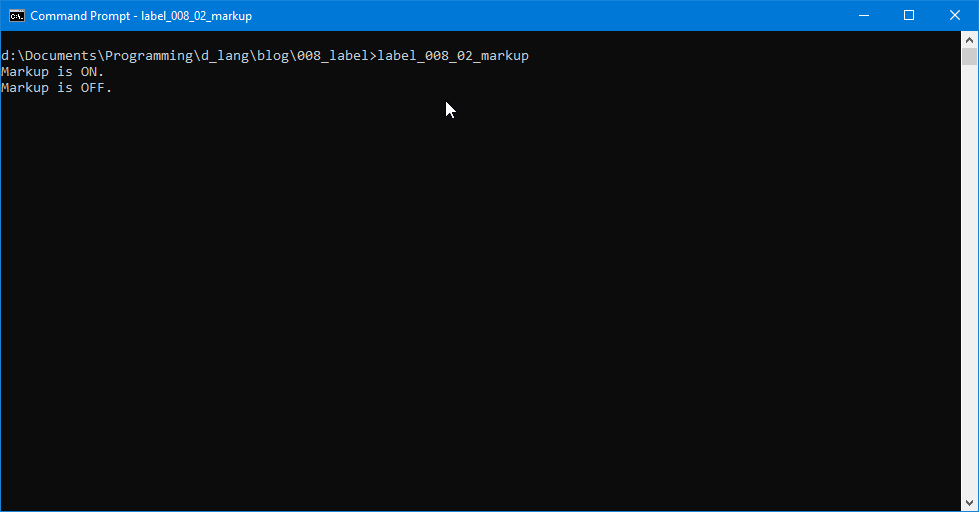
void markupState()
{
writeln(currentStateMessage);
} // markupState()
} // class MarkupLabel
Most of this (as is usual by now) is standard stuff. Some notable exceptions being:
- the
markupTextstring uses HTML formatting circa 1999, and - we have to explicitly tell the
LabeltosetUseMarkup()so the markup will show.
And the rest is a function to switch the Label’s appear and another to relay the Label’s state to the command shell.
Okay, well that was fun. Keep those cards and letters coming in and I’ll see you next time around.

Comments? Questions? Observations?
Did we miss a tidbit of information that would make this post even more informative? Let's talk about it in the comments.
- come on over to the D Language Forum and look for one of the gtkDcoding announcement posts,
- drop by the GtkD Forum,
- follow the link below to email me, or
- go to the gtkDcoding Facebook page.
You can also subscribe via RSS so you won't miss anything. Thank you very much for dropping by.
© Copyright 2024 Ron Tarrant