0012: Layout Containers
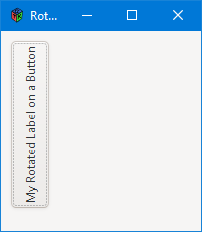
Starting today, we’ll be looking at a few examples of using a Layout container. Since we’ve already covered the Box container, playing with Layout containers won’t be foreign, so we’ll throw in some extra techniques to keep it interesting, things like presenting a button vertically instead of horizontally.
Today’s example files show:
- a rotated button and
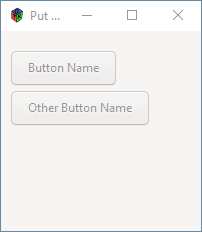
- multiple buttons in a layout.
Why a Layout?
Placing widgets in a container using absolute coordinates is discouraged. Why? If your application is translated into another language or the user fiddles with font settings at the OS level, the beauty and balance of your layout is going out the window… so to speak.
But if you’re just writing utilities and applications for your own use, then hey: knock yourself out. (I do.) Anyway, it’s included here for completeness sake, so let’s get at it and since the main() function and the TestRigWindow class are the same as other examples, let’s look at the meat.
Put that Widget Down
class MyLayout : Layout
{
	this()
	{
		super(null, null);

		RotatedButton rotatedButton = new RotatedButton();
		put(rotatedButton, 10, 10);

	} // this()

} // class MyLayout
Like the Box we used in earlier examples, the derived Layout is mostly about getting the kids under control. The big difference here is that we don’t rely on the container to work out where things go. Instead, we use the put() function which takes a pointer to the child widget as well as the x and y coordinates where you want it placed.
Another drawback of using a Layout, and therefore the put() function, is that it’s going to take several code-compile-test cycles before you can lock down exactly what x and y should be. And these cycles increase in number with the complexity of your design. If for no other reason, you may want to let the Layouts lie and pack some Boxes instead.
Rotated Button


And here’s that rotated button I mentioned earlier:
class RotatedButton : Button
{
	this()
	{
		super();

		RotatedLabel rotatedLabel = new RotatedLabel();

		addOnClicked(delegate void(_) { doSomething(); } );
		add(rotatedLabel);

	} // this()


	void doSomething()
	{
		writeln("Action from a rotated button...");

	} // doSomething()

} // class rotatedButton
Of course, there’s nothing here to indicate it’s at a non-standard angle. Nope, it’s all pretty straightforward here. So, where is the angle set?
The Real Rotated Widget: the Label
The rotation is in here with the setAngle() function:
class RotatedLabel : Label
{
	string rotatedText = "My Rotated Label on a Button";

	this()
	{
		super(rotatedText);

		setAngle(90);

	} // this()

} // class RotatedLabel
It’s done this way because setAngle() is only found in the Label widget. But whatever gets the job done, right? There’s a lot of that in GUI design.
Counter Intuitive?
Something else to keep in mind: angles go counter-clockwise. So if you want something angled 90 degrees to clockwise, you’ll have to set it to 270 degrees.
Conclusion
And that’s pretty much it for this time. Yes, I mentioned a second code file at the beginning of this post, but all it does is put() a second button in the layout. Neither button is rotated, nor do they do anything we haven’t seen before, so there’s nothing new or exciting in the second example. It’s there mainly because I’d feel remiss if I didn’t show a button in a standard position/rotation.


And with that said, Insert vague comparison between GTK and popular space opera culture here.
Bye, now.
Comments? Questions? Observations?
Did we miss a tidbit of information that would make this post even more informative? Let's talk about it in the comments.
- come on over to the D Language Forum and look for one of the gtkDcoding announcement posts,
- drop by the GtkD Forum,
- follow the link below to email me, or
- go to the gtkDcoding Facebook page.
You can also subscribe via RSS so you won't miss anything. Thank you very much for dropping by.
© Copyright 2024 Ron Tarrant
