0033: Menus VIII - An Image, a Label and an AccelKey
Remember how I said that the GTK ImageMenuItem was deprecated? Well, with it went the easy way to add an accelerator key to a MenuItem that also has an image.
Well, whether it’s useful or not, we can fake it, so here goes nothing…
Fake ImageMenuItem Accel Key
Don’t Forget to Add AccelGroup to Your Window
Because if you do forget, this isn’t gonna work. Here’s TestRigWindow’s constructor (we saw this last time, but here’s a refresher):
this()
{
	super(title);
	setDefaultSize(640, 480);
	addOnDestroy(&quitApp);

	accelGroup = new AccelGroup();
	addAccelGroup(accelGroup);

	AppBox appBox = new AppBox(accelGroup);
	add(appBox);

	showAll();

} // this()
Such an important line:
addAccelGroup(accelGroup);
Add the FileMenu
This really hasn’t changed since last time we did a fake image MenuItem:
class FileMenu : Menu
{
	FakeImageMenuItem appleItem;
	ExitMenuItem exitMenuItem;

	this(AccelGroup accelGroup)
	{
		super();

		appleItem = new FakeImageMenuItem(accelGroup);
		append(appleItem);

		exitMenuItem = new ExitMenuItem(accelGroup);
		append(exitMenuItem);

	} // this()


} // class FileMenu
The All-new FakeImageMenuItem
This is the mouthful of code you’ll need to chew on to get this working:
class FakeImageMenuItem : MenuItem
{
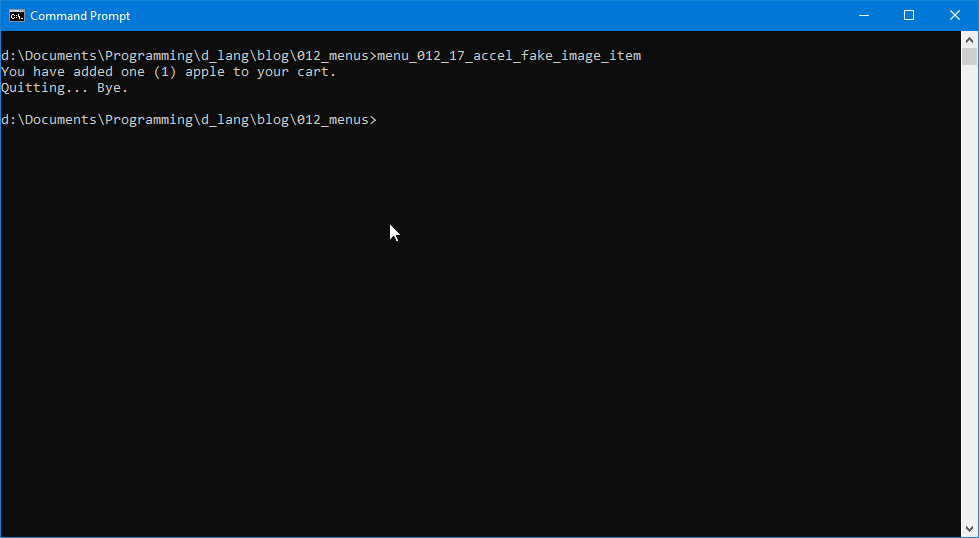
string actionMessage = "You have added one (1) apple to your cart.";
Box imageMenuBox;
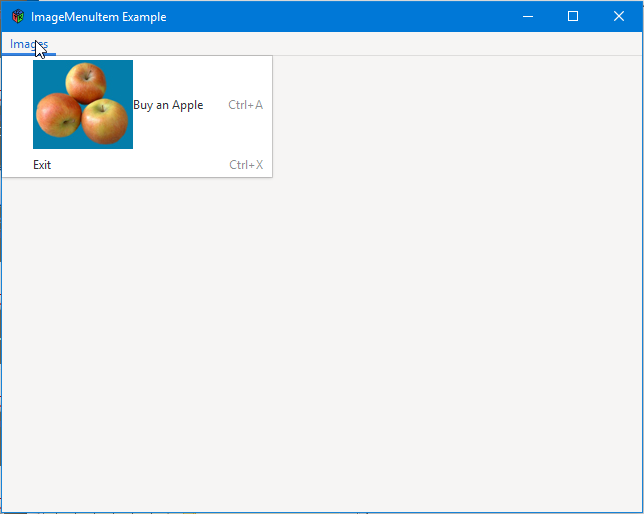
string labelText = "Buy an Apple";
string imageFilename = "images/apples.jpg";
Image image;
AccelLabel accelLabel;
char accelKey = 'a';
this(AccelGroup accelGroup)
{
super();
addOnActivate(&reportStuff);
imageMenuBox = new Box(Orientation.HORIZONTAL, 0);
add(imageMenuBox);
image = new Image(imageFilename);
accelLabel = new AccelLabel(labelText);
accelLabel.setXalign(0.0);
accelLabel.setAccelWidget(this);
addAccelerator("activate", accelGroup, accelKey, ModifierType.CONTROL_MASK, AccelFlags.VISIBLE);
imageMenuBox.add(image);
imageMenuBox.packEnd(accelLabel, true, true, 0);
} // this()
void reportStuff(MenuItem mi)
{
writeln(actionMessage);
} // exit()
} // class FakeImageMenuItem
There’s a lot going on here, but skipping over the bits we’ve covered in earlier posts, here’s what’s new or unusual:
First is this line:
addOnActivate(&reportStuff);
I bring this to your attention because in the previous example of accelerator keys, we didn’t use this line. But this time, we do and we’ll see why in a moment.
After that we:
- create the
Box, - stuff the
Boxinto theMenuItem(which is a container, right?), - we build an
Image, - and a
Label…
Not a Label, an AccelLabel. And why? Because we have to do these extra bits of twiddling to get this to work:
accelLabel.setXalign(0.0);
accelLabel.setAccelWidget(this);
And those functions are only available with the AccelLabel.
The Xalign() call gives us room in the Box so the accelerator key (that’s Ctrl-A) won’t overlap the Label.
And then the AccelLabel needs to know which Widget to pair up with. In this case, it’s the FakeImageMenuItem (which is really a MenuItem).
Now with this line, we get to the other half of why we still need to hook up the signal:
addAccelerator("activate", accelGroup, accelKey, ModifierType.CONTROL_MASK, AccelFlags.VISIBLE);
When we added accelerators in the previous example, last post (which I’ve also done in this example with the Exit MenuItem so you have both close to hand for comparison) we did it via an overloaded call to the super-class constructor.
But here, we can’t because the work is split up between several widgets. So we use the addAccelerator() function instead.
Now another crucial thing to bear in mind: When you pack the Image and the AccelLabel into the Box, you have to add() the image and packEnd() the AccelLabel, which is these lines:
imageMenuBox.add(image);
imageMenuBox.packEnd(accelLabel, true, true, 0);
Conclusion
I’m going to come clean, here. I didn’t come up with the idea for this code. The C version appears in a comment in the GTK source. I did, however, port it to D which turned out to be more of a challenge than I thought it would be. But when it finally worked, the feeling of satisfaction was worth all the griping and hair-pulling. (Isn’t it always?)
And that just about sums up today’s exploration of accelerator keys and imagery on menus. Be kind to each other and next time we’ll talk about a little D-centric OOP trick we can use so we don’t have to pass the AccelGroup down from the Window object through all those levels to get it to where it’s needed in the MenuItem objects.
Until then…

Comments? Questions? Observations?
Did we miss a tidbit of information that would make this post even more informative? Let's talk about it in the comments.
- come on over to the D Language Forum and look for one of the gtkDcoding announcement posts,
- drop by the GtkD Forum,
- follow the link below to email me, or
- go to the gtkDcoding Facebook page.
You can also subscribe via RSS so you won't miss anything. Thank you very much for dropping by.
© Copyright 2023 Ron Tarrant